Uploading Images
Uploading Images in the CommonSpot CMS
Overview
Each image for the site is stored in the site's Image Gallery. Once an image is uploaded into the gallery, it can be inserted onto the site in an element.
If your images are large, we recommend that you resize them before uploading. If you don't know how to resize your images, view the resizing images tutorial.
Step 1: Log in and View the Toolbars
- Log in to the site.
- Select View Page in CommonSpot to see the CommonSpot toolbars.
Step 2: Add Your Image
Choose Where to Upload Your Image

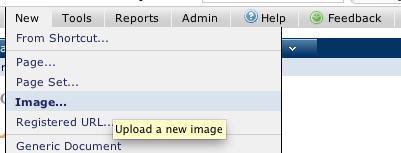
- Click New in the gray toolbar.
- Click on Image.
- Select the subsite (folder) you want to upload the image into.
Uploading a Single Image
- Click Upload a Single Image.
- Under Upload New Image, click the Browse button.
- Description: A brief description of the image.
- Category: What kind of image is it?
- Keywords: What words do you think people would put in a search box to find this image?
-
- This is especially helpful when finding your image in the Image Gallery later.
- Include in Public Image Gallery: Check this if you want people to be able to re-use this image on the website.
- Click Next.
Uploading Multiple Images
Upload the Images
- Click Upload Multiple Images.
- Add your images to the box. Either:
-
- Drag the images into the box.
- Click Add Image and browse to the image on your computer for each one.
- Click Upload Images.
- There will be a screen informing you that the images have been added to your Pending Images.
- Click Next.
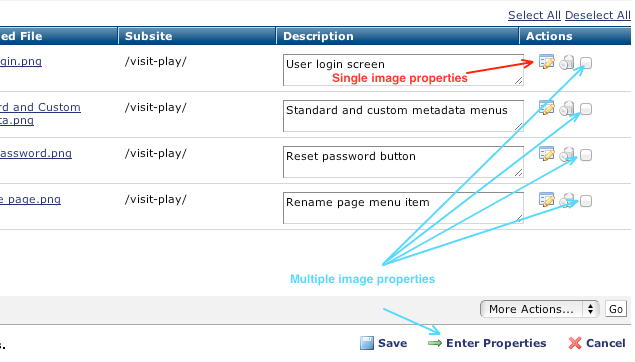
- Give each image a description (A brief description of the image).

Enter the Image Properties for Each Image
- To do each image separately, click on the pencil icon next to the image.
- If more than one image shares the same properties (including keywords) then select the box next to each and click on Enter Properties.
Fill out the Image Properties:
- Category: What kind of image is it?
- Keywords: What words do you think people would put in a search box to find this image?
-
- This is especially helpful when finding your image in the Image Gallery later.
- Include in Public Image Gallery: Check this if you want people to be able to re-use this image on the website.
- Click Next.
Global Metadata
- Department: Which department is providing the information on this page?
- Topic: Hierarchical list of topics relevant to city and county governments.
- Audience: Does this page best apply to a certain group of people?
- Ward: Does this page best apply to a specific ward or wards?
- Neighborhood: Does this page best apply to a specific neighborhood or neighborhoods?
- Content Type: List of content genres.
- If this image needs to be attributed to the artist, go to the Image tab. Otherwise, click Finish.
Image Metadata
If this image is a banner image, it needs the Image Metadata filled out. This allows the site to display the image Title, and give the photographer credit.
- Image Title: The official name/title of the image.
- Image Source: Who took the picture or created the image.
- Contact Data: The artist's email address.
- Click Finish.
The image has now been added to the image gallery, and is ready to be inserted on a page.
Feedback is anonymous.