Formatted Text Block Element
Inserting and using the Formatted Text Element.
Prerequisites
This tutorial assumes you already know the following:
Overview
Formatted text blocks allow you to put formatted text on your webpage.
This includes things like:
- Links
- Lists (bulleted and numbered)
- Bold text
- Italicized text
- Tables
Formatted Text Block Element
Video: Using the formatted text block element in CommonSpot
Step 1: Work on This Page
Make sure you are in Work on This Page mode, viewing either Your Changes or All Changes.
Step 2: Insert the Formatted Text Block Element

- Choose the container that you want the Formatted Text Block element to be in.
- Click Click to insert new element at the bottom of the container.
- In the Element Gallery, click on Text Elements.
- Click on Formatted Text Block (without header).
Step 3: Define the Formatted Text Block Element

- The Single Image element is now inside your container.
- Click Click here to define the Formatted Text Block (without header) element at the bottom of your container.
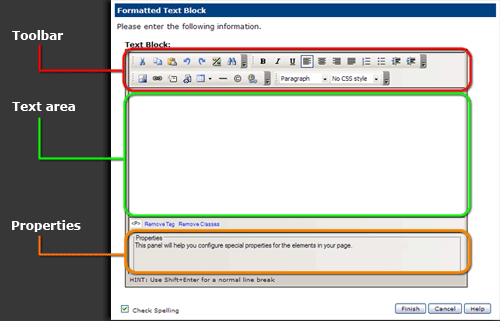
- You should now see the Formatted Text Block window, shown below.

Toolbar
The icons in the toolbar allow you to format your text, and insert things like tables, images, and links. If you hover over an icon, it's name will pop up.
For an explanation of each toolbar option, see the Formatted Text Block Toolbar reference page.
Text Area
This is where you type your content.
See the Website Content Style Guide for tips on writing for the web.
Properties
Some text block items have properties that can be modified. Images can be given padding, numbered list styles can be changed, etc.
Check Spelling
If this is checked, CommonSpot will check your spelling when you press Finish.
Step 4: Submit Your Changes
- Once you are satisfied with your formatted text, press the Finish button.
- The Formatted Text Block Element needs to be submitted before the public can see it.